
Isolation & Identification of Micror organism from Water/ Environment/Product.
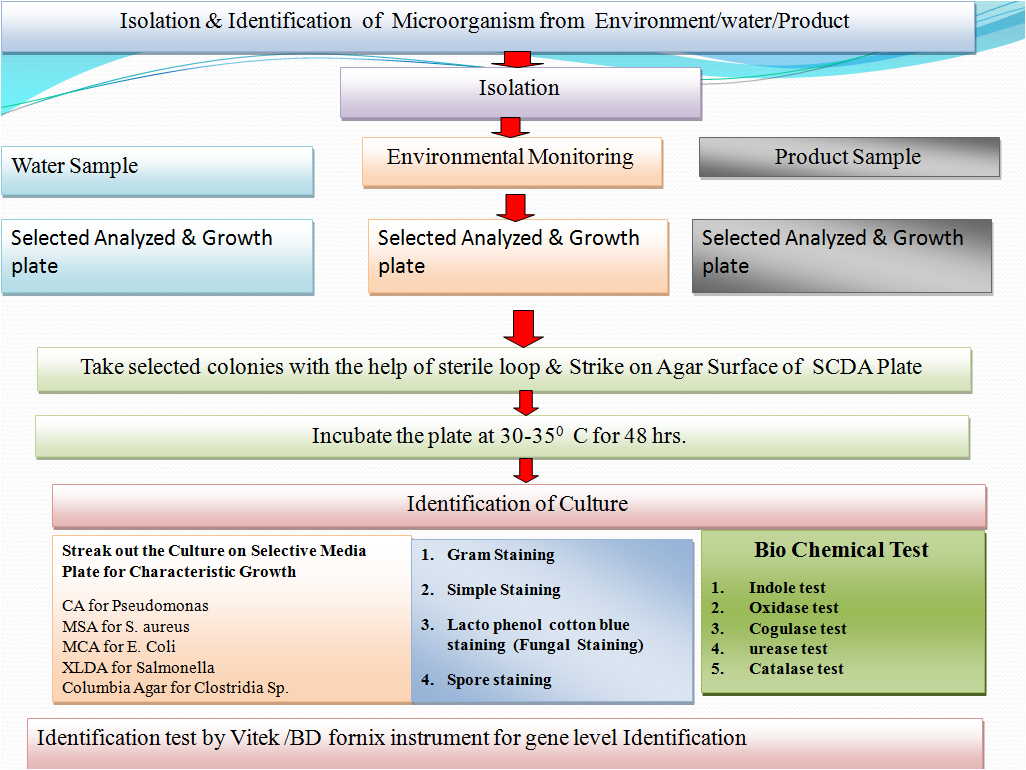
Flow diagram of Isolation & Identification of Environment isolates :-
1.0 OBJECTIVE:
To lay down the procedure for Isolation & Identification of Environment isolates.
2.0 SCOPE:
2.1 The scope of this document is to describe the procedure for identification of standard Microbial cultures/Ready to use cultures used for various microbiological purposes.
2.2 This procedure is applicable for identification of In house isolates.
2.3 This procedure is also applicable for maintenance of culture library for the In house isolates.
3.0 RESPONSIBILITY:
3.1 Microbiologist / Trained person
3.1.1 To perform the activities as per procedure.
3.1.2 To report any non compliance to the procedure
3.1.3 To prepare and maintain the culture library and the details as per procedure
3.2 Head Microbiology
3.2.1 To ensure the activities are performed as per procedure
3.2.2 To ensure the activities are performed as per the laid down schedules.
3.2.3 To investigate any non compliance to the procedure
4.0 ACCOUNTABILITY :
4.1 Head Quality Control
4.1.1 To ensure the procedure is implemented at their site
4.1.2 To investigate any non compliance to the procedure.
4.2 Head Quality Assurance
4.2.1 To ensure the implementation of procedure at their site.
4.2.2 To verify investigation of any non compliance to the procedure.
5.0 PROCEDURE:
5.1 Definition:
- Aseptic technique: Aseptic technique refers to the procedure used to avoid the introduction of microorganisms into the vulnerable site. The principle aim of an aseptic technique is to protect the patient/articles/materials from contamination by pathogenic organisms. (RABS)
- Seed Lot Technique: Seed Lot technique is used to provide a method for generation of a working culture no more than 5 passages removed from the original stock from the national repository.To provide a method for generation of a pure culture for laboratory work.To provide a method for generation of a traceable culture for laboratory investigations.
- Reference strains:Microorganisms defined at least to the genus and species level, catalog and described according to its characteristics and preferably stating its origin. Normally obtained from a recognized national or international collection center.
- Working culture:A primary subculture from a reference stock used as a reference in Microbiological analysis.
- Biological safety cabinet (BSC): A ventilated cabinet with unidirectional HEPA-filtered airflow and HEPA-filtered exhaust to protect the worker from hazardous drugs. A BSC used to perform an activity must be capable of providing an ISO Class 5 environment for the activity.
- Laminar airflow system (LAF): A device or zone within a buffer area that provides an ISO Class 5 or better environment for sterile compounding/activities. The system provides a unidirectional HEPA-filtered airflow.
- Sterile: Any material that has been subjected to the process of Sterilization (process that destroys or removes all viable microorganisms) is said to be sterile. Any article that is free from living germs or microorganisms.
- In house Isolate:The newly identified microorganism or a non standard microorganism isolated from any source such as environment, water, product, raw material, packing material etc. The microorganism shall be a bacteria, yeast or mold(fungus) which shall or shall not be detrimental to the persons, products, area or system are collectively termed as In house isolates.
- Passage: Transfer of organisms from a viable culture to a fresh medium with growth of the microorganisms. Any form of sub culturing is considered to be transfer/passage.
- Bergey’s Manual of systematic bacteriology: Is a reference book with one of the most comprehensive and authoritative works in the field of bacterial taxonomy, has been extensively revised in the form of a five volume second edition.
- Microbial classification: The arrangement of microorganisms into taxonomic groups based on their similarities and relationships.
- Microbial identification: The determination of which broad group (e.g. Bacteria, yeast or mold (fungus) or narrow group (e.g. Genus and/or species) to which a in house isolate belongs.
- Microbial characterization: The use of colony growth, cellular morphology, different staining and key diagnostic features to characterize an in house isolate for trending and investigative purposes without identification e.g. Non pathogenic Staphylococci
- Strain: A specific isolate of a species that is maintained in pure culture and is characterized. The type strain is representative of the species that provides a reference for the species based on its historic isolation, characterization, and deposition in recognized culture collections.
- Strain typing: Strain typing is an integral part of epidemiological investigations in clinical and public health microbiology. Methods including pulsed-field gel electrophoresis, riboprinting, arbitrarily primed polymerized chain reaction, and whole genome ordered restriction or optical mapping can be used to demonstrate that microbial species are the same strain and most likely are from a common source.
OPERATIONAL/ROUTINE PROCESS MONITORING REQUIREMENTS:
5.2 General instructions.
- Biological cultures can be the most delicate standards to handle because their viability and characteristics are dependent on adequate handling and storage.
- Standardizing the handling and storage of cultures by the user laboratory shall be done in a way that will minimize the opportunity for contamination or alteration of growth characteristics.
- The confirmation of identity for commonly used laboratory strains shall ideally be done at the level of genotypic analysis (i.e., DNA fingerprinting, 16S rRNA gene sequencing, or PCR analysis using suitably validated probes) or a suitable method to determine the genus and species of the organism (e.g. Biochemical/Enzymatic substrate kits).
- Conduct all culture handling activity in “Culture Handling Room” preferably using a Bio safety cabinet (BSC).
5.2.5 If the site does not have separate culture handling room, of a Bio safety cabinet then other barriers and aseptic practices shall be employed to reduce the likelihood of accidental contamination. These practices shall be well explained in the site specific SOP. - Few practices which can be followed are stated, but not limited to, below:
-
-
- Testing of samples before testing/handling of cultures.
- Decontamination of testing LAF/UAF, prior and after culture handling.
- Different operators for culture handling and sample testing.
-
- All cultures and other related remaining contents of cultures shall be decontaminated before discarding.
- Take utmost precaution to avoid contamination of the cultures.
5.3 Precautions while handling cultures:
- After transferring the culture, always return the cotton plugs or caps to the correct tubes/vials etc.
- Never forget to sterilize the inoculating loop before returning back into the holder.
- Always flame the tips of the tube before you insert the loop and after the withdrawal from the tube.
- The plug after removal must be kept in hand. Never place the plug on the work surface or touch it to anything except the lamed lip of culture tube.
- Do not dip the loop into the agar while inoculating slant.
- Never leave the culture tube open for longer time than the time needed to transfer the culture.
- All cultures must be handled with care, regardless of the fact that the organism shall or shall not be a known pathogen. All work must be performed using aseptic techniques.
- Cultures must be handled under LAF/UAF/BSC only.
5.4 Challenges in Microbial Identification.
- Traditional methods of bacterial identification rely on phenotypic identification of the causative organism using gram staining, culture and biochemical methods.
- These methods of bacterial identification suffer from two major drawbacks. First, they can be used only for organisms that can be cultivated in vitro. Second, some strains exhibit unique biochemical characteristics that do not fit into patterns that have been used as a characteristic of any known genus and species.
- Many molecular techniques have proven beneficial in overcoming some limitations of traditional phenotypic procedures for the detection and characterization of bacterial phenotypes.
- Several non-culture based methods have emerged in the past few years.
- Real time PCR and microarrays are currently the most commonly employed molecular techniques. Real time PCR is highly sensitive and allows quantitation of bacteria at a species level. Microarray based bacterial identification relies on the hybridization of preamplifier bacterial DNA sequences to arrayed species-specific oligonucleotides. Each probe is tagged with a different colored dye which fluoresces upon hybridization.
- No traditional method for identification of molds (fungus) are available only identification technique for mold identification is staining and colony characteristics.
- The genotypic method of identification require expertise, time with high cost of analysis.
- The selection of method(s) used for microbial identification depends on the type and nature of the microorganism.
- The method(s) chosen should be well-described in scientific literature and consistent with those currently used in the field of microbial identification and taxonomic classification and they must enable identification of the organisms to the genus and species and, if possible, strain level.
- The robustness, precision and validity of the methodologies used to identify the microorganism are critical elements in the assessment of the safety of the product.
5.5 General Information:
- Routine characterization of microorganisms shall include the determination of colony morphology, cellular morphology (rods, cocci, cell groupings, modes of sporulation, etc.),
- Gram reaction or other differential staining techniques, and certain key biochemical reactions (e.g., oxidase, catalase, and Coagulase activity) shall be used for preliminary identification.
- Microbial characterization to this level is sufficient for many risk-assessment purposes in non sterile pharmaceutical manufacturing operations and in some sterile product manufacturing environments especially for the organisms identified in alert level excursions.
- In some cases a more definitive identification of the microorganisms like genus- and species-level identification shall be carried out. Strain-level identification shall be performed only in case of investigation for Sterility Test failures and Media Fill failures to determine the source of the microorganism.
- Identification is especially common when organisms are recovered at atypically high rates or in numbers that exceed recommended levels for specific categories of products like Injectables, Sterile products etc.
- Microbial identification is useful in aseptic processing and is necessary where sterility test positives have occurred and in the assessment of contamination recovered from failed aseptic process simulations, i.e., media fills.
- Microbiological identification systems are based on different analytical methodologies, and limitations shall be inherent to the method and/or arise from database limitations.
- Identification is accomplished by matching characteristics (genotypic and/or phenotypic) to an established standard (reference) organism such as a type strain.
- If a microorganism is not included in the database it will not be identified, thus while procuring a new identification system review the breadth of the database of the identification system and its applicability to the requirement.
- Following phenotypic characteristics are used in Microbial Taxonomy
| Categories | Characteristics |
| Culture | Colony morphology, colony color, shape and size, pigment production |
| Morphological | Cellular morphology, cell size, cell shape, flagella type, reserve material, Gram reaction,spore and acid-fast staining, mode of sporulation |
| Physiological | Oxygen tolerance, pH range, temperature optimum and range, salinity tolerance |
| Biochemical | Carbon utilization, carbohydrate oxidation or fermentation, enzyme patterns |
| Inhibition | Bile salt-tolerance, antibiotic susceptibility, dye tolerance |
| Serological | Agglutination, fluorescent antibody |
| Chemo-taxonomic | Fatty acid profile, microbial toxins, whole cell composition |
| Ecological | Origin of the organism |
11. The microbial genotype is well conversed and unaffected by the cultural conditions. After isolation following genotypic characteristics are used in Microbial Taxonomy.
| Categories | Characteristics |
| Genotypic | DNA base ratio (G + C content), restriction fragment patterns, and DNA probes |
| Phylogenetic | DNA–DNA hybridization, and 16S and 23S rRNA sequences |
5.6 Isolation of Pure culture-Standard culture
- Perform revival of the standard culture as per SOP on Microbial culture maintenance and enumeration
- Check the purity of culture growth observed in the enriched medium by simultaneously streaking the culture on a Sterile, pre prepared, pre incubated Soyabean Casein Digest Agar/R2A /Nutrient Agar plate for Bacterial cultures and Sterile, pre prepared, pre incubated Sabouraud Dextrose Agar for Yeast and Mold cultures.
- Incubate the streaked plates as per the conditions mentioned in Table 1.
- Table -1
| Sr. No. | Name of Culture |
Incubation Temperature and time |
| 1 | Escherichia coli ATCC 8739 | 30-35ºC for 24-48 hrs. |
| 2 | Bacillus subtilis ATCC 6633 | 30-35ºC for 24-48 hrs. |
| 3 | Candida albicans ATCC 10231 | 20-25ºC for 48-72 hrs. |
| 4 | Clostridium sporogenes ATCC 11437 | 30-35ºC for 24-48 hrs under anaerobic conditions |
| 5 | Pseudomonas aeruginosa ATCC 9027 | 30-35ºC for 24-48 hrs. |
| 6 | Staphylococcus aureus ATCC 6538 | 30-35ºC for 24-48 hrs. |
| 7 | Aspergillus brasiliensis ATCC 16404 | 20-25ºC for 3-5 days. |
| 8 | Salmonella enterica ssp. Enterica serovar abony NCTC 6017 | 30-35ºC for 24-48 hrs. |
| 9 | Staphylococcus epidermidis ATCC 12228 | 30-35ºC for 24-48 hrs. |
| 10 | Escherichia coli ATCC 11105 | 30-35ºC for 24-48 hrs. |
| 11 | Kocuria rhizophila ATCC 9341 | 30-35ºC for 24-48 hrs. |
| 12 | Brevundimonas diminuta ATCC 19146 | 30-35ºC for 24-48 hrs. |
| 13 | Shigella boydii ATCC 8700 | 30-35ºC for 24-48 hrs. |
| 14 | Proteus vulgaris ATCC 8427 | 30-35ºC for 24-48 hrs. |
- If identification systems are available identify the organism by following the procedure specific to the identification system .This confirmation of identity for commonly used laboratory strains shall ideally be done at the level of genotypic analysis (i.e., DNA fingerprinting, 16S r RNA gene sequencing,or PCR analysis using suitably validated probes) or a suitable method to determine the genus and species of the organism (e.g. Biochemical/Enzymatic substrate kits).
- If identification instrument is not available, perform primary and secondary biochemical tests.
- Purity check shall be done for all the standard cultures for the following parameters listed below.
- Gram staining reaction/monochrome or simple staining for bacterial and yeast cultures, lactophenol cotton blue staining for fungal/mold cultures.
- Perform the staining and note the characteristics observed for the culture.
- The growth on media shall not show any contamination and Gram staining slide shall show only the characteristic cells of that particular culture.
- The parameters of purity check as mentioned in Table 2 and Annexure shall be followed for the cultures.
- The growth observed in the selective media, the colony morphology, Gram character shall be observed and recorded as per the SOP on Microbial culture maintenance and enumeration.
- The culture shall be confirmed based on the above tests and as described in Table 2 and Annexure 1.
- If the culture fails in the purity check, inform the supplier/manufacturer and proceed with revival of a fresh culture.
- Confirm the purity of the fresh culture and then use for routine usage.
- Table 2:
| Sr. No. | Name of Culture | Confirmatory Purity Check Parameters |
| 1 | Escherichia coli ATCC 8739 | Gram negative rods, growth of Brick red, generally non-mucoid colonies sometimes surrounded by a precipitation Bile zone when grown on Mac Conkey’s Agar.Growth of blue black colonies with greenish metallic sheen when grown on EMB Agar |
| 2 | Bacillus subtilis ATCC 6633 | Gram positive bacilli , growth of colonies with irregular edges when grown on Soyabean Casein Digest Agar |
| 3 | Candida albicans ATCC 10231 | Elliptical shaped cells in monochrome or simple staining, growth of white to off white colonies when grown on Sabouraud dextrose Agar |
| 4 | Clostridium sporogenes ATCC 11437 | Gram positive bacilli, growth in anaerobic conditions when grown in SCDA butt |
| 5 | Pseudomonas aeruginosa ATCC 9027 | Gram negative rods, growth of greenish colonies with greenish fluorescence when grown on Cetrimide Agar |
| 6 | Staphylococcus aureus ATCC 6538 | Gram positive cocci in grape like clusters, growth of yellow pigmented colony when grown on Mannitol Salt Agar. Coagulase positive. |
| 7 | Aspergillus brasiliensis ATCC 16404 | Luxuriant growth of white colonies turning to black with powdery texture. Fungal spores and hyphae observed as dark blue colored. Septate hyphae are observed. Refer Picture 1 & 2 |
| 8 | Salmonella enterica ssp. enterica serovar abony NCTC 6017 | Gram negative rods,growth of well developed, Red Colonies, with or without Black Centers when grown on XLD Agar |
| 9 | Staphylococcus epidermidis ATCC 12228 | Gram positive cocci in grape like clusters, growth of yellow pigmented colony when grown on Mannitol Salt Agar. Coagulase negative. |
| 10 | Escherichia coli ATCC 11105 | Gram negative coccobacilli, growth of Brick red, generally non-mucoid colonies sometimes surrounded by a precipitation Bile zone when grown on Mac Conkey’s Agar.Growth of blue black colonies with greenish metallic sheen when grown on EMB Agar |
| 11 | Kocuria rhizophila ATCC 9341 | Gram positive cocci, growth of bright yellow colonies colony when grown on Soyabean Casein Digest Agar |
| 12 | Brevundimonas diminuta ATCC 19146 | Gram negative bacilli, growth of colorless colonies with no pigmentation when grown on Soyabean Casein Digest Agar |
| 13 | Shigella boydii ATCC 8700 | Gram negative bacilli, growth of colorless colonies when grown on Soyabean Casein Digest Agar |
| 14 | Proteus vulgaris ATCC 8427 | Gram negative bacilli, highly motile, growth of creamish colonies when grown on Soyabean Casein Digest Agar |
5.7 Gram staining technique
- Prepare a thin smear of the culture to be examined on a clean and dried glass slide and heat fix it by gently passing on the flame. Allow the slide to cool.
- Follow the procedure as specified by the Gram stain kit manufacturer or else follow the below mentioned procedure.
- Add 3-4 drops of primary stain i.e. Gram’s crystal violet solution on the smear and allow to stand for one minute.
- Wash the crystal violet solution with running tap water and air dry.
- Add 3-4 drops of Gram’s iodine solution and allow to stand for 1-2 minutes.
- Wash the Gram’s iodine solution with running tap water and air dry.
- Add 3-4 drops of Gram’s decolourizer on the smeared slide and allow to stand for 30-60 seconds.
- Wash the Gram’s decolourizer with running tap water and air dry.
- Add 3-4 drops of counter stain i.e. Saffranin solution 2.5% (w/v) on the slide and allow to stand for one minute.
- Wash the Saffranin solution with running tap water and air dry.
- Observe the slide under microscope with 10X, 40X and then with Oil immersion objective(100X) and record the observations.
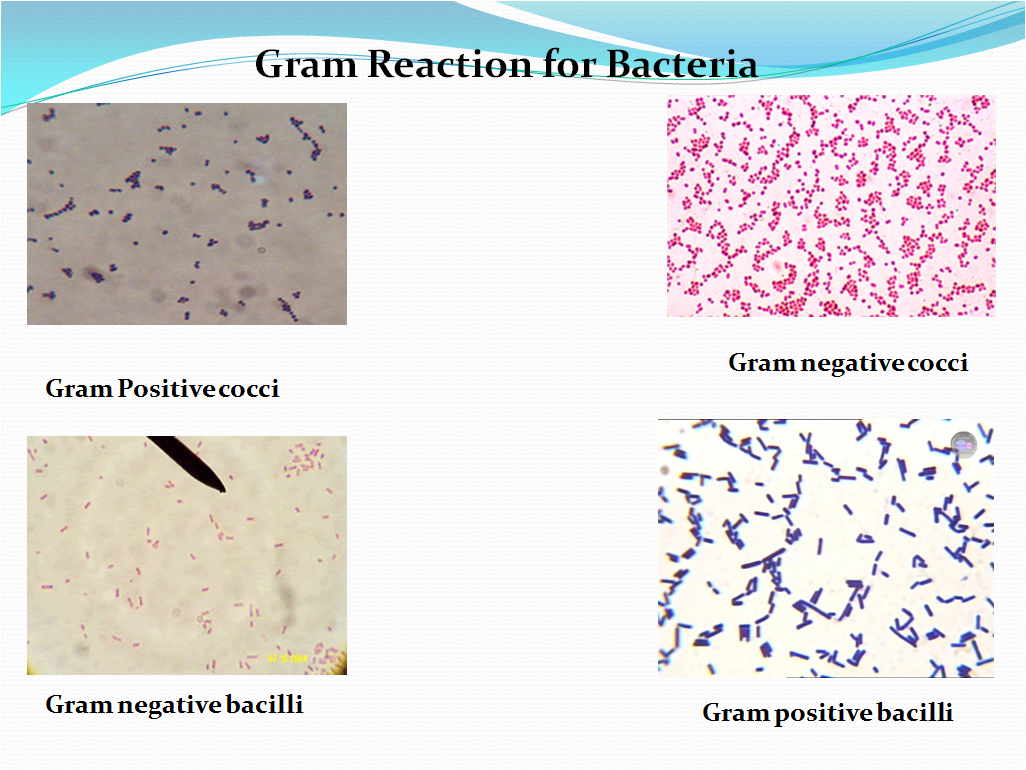
- Gram positive organisms will retain the crystal violet-iodine complex and appear dark blue or purple in color. Refer Picture 2-Gram reaction for Bacteria.
- Gram negative organisms will appear pink to light red in color.
- Refer Picture 2-Gram reaction for Bacteria.

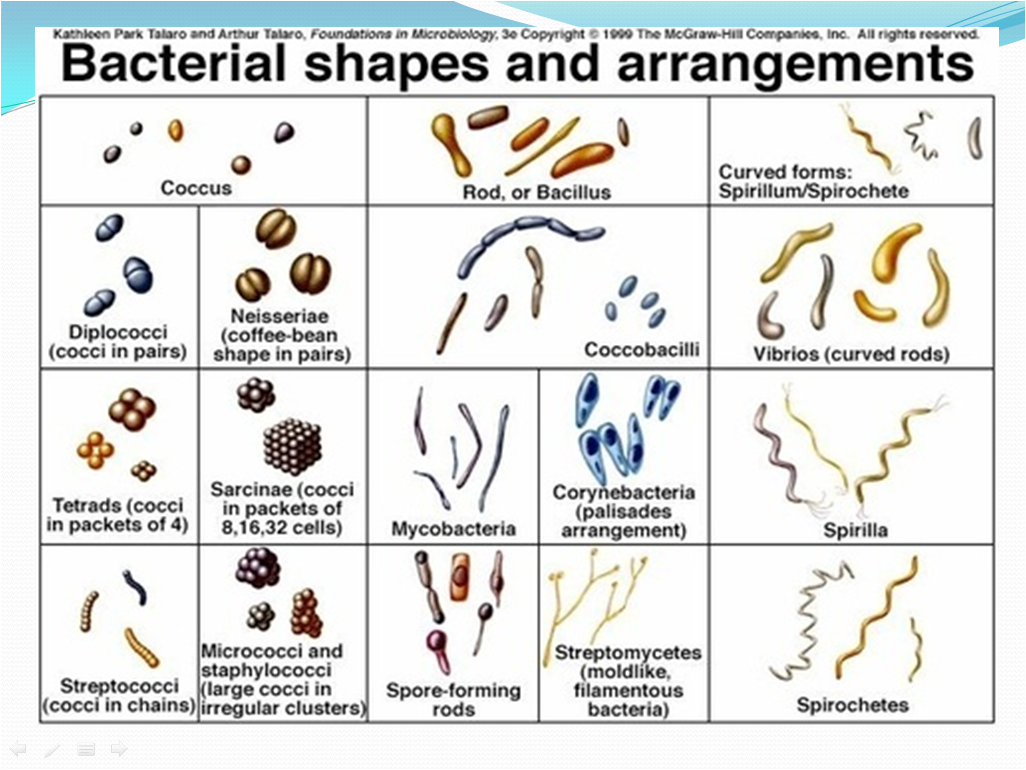
- Check the shapes and arrangement of the bacteria while observation of slide along with the Gram reaction as per Picture 1-Bacterial shapes and arrangements and note the details in Format .
- Picture -1
- Bacterial Shapes and arrangements
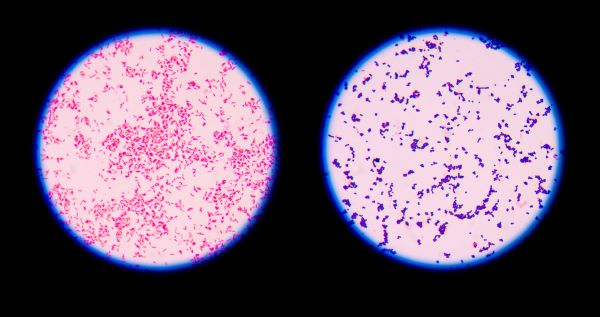
Picture -2
Gram Reaction for Bacteria
5.8 Lactophenol cotton blue staining
- Take a clean grease free slide.
- Aseptically open the microbial culture tube containing the fungal culture under LAF/UAF/BSC.
- Take the mycelium (for filamentous fungi) of the fungi with the help of straight needle and sterile forceps and place it on the slide.
- Carefully tease the mycelium and add few drops of Lactophenol cotton blue and cover the whole mycelium. Cover the teased stained mycelium with clean grease free cover slip and observer under microscope.
- View under microscope first using 10X, 40 X and then if required use the 100X Oil immersion objective.
- Compare the morphology of the culture observed on the SDA Agar plate with the Picture 3 and under the microscope with the morphology in Picture 4 if the culture is of A.brasiliensis or Picture 5 for commonly found fungal organisms and their microscopic characteristics.
- E.g. For culture of A.brasiliensis. The hyphae are septate, conidial heads are radiate, conidiospores are hyaline smooth walled with length of 400- 3000 micrometer long and are becoming darker at the apex and terminating in globose vessicle.
- Fungal cells will appear blue colored when stained by lactophenol blue.
Picture -3
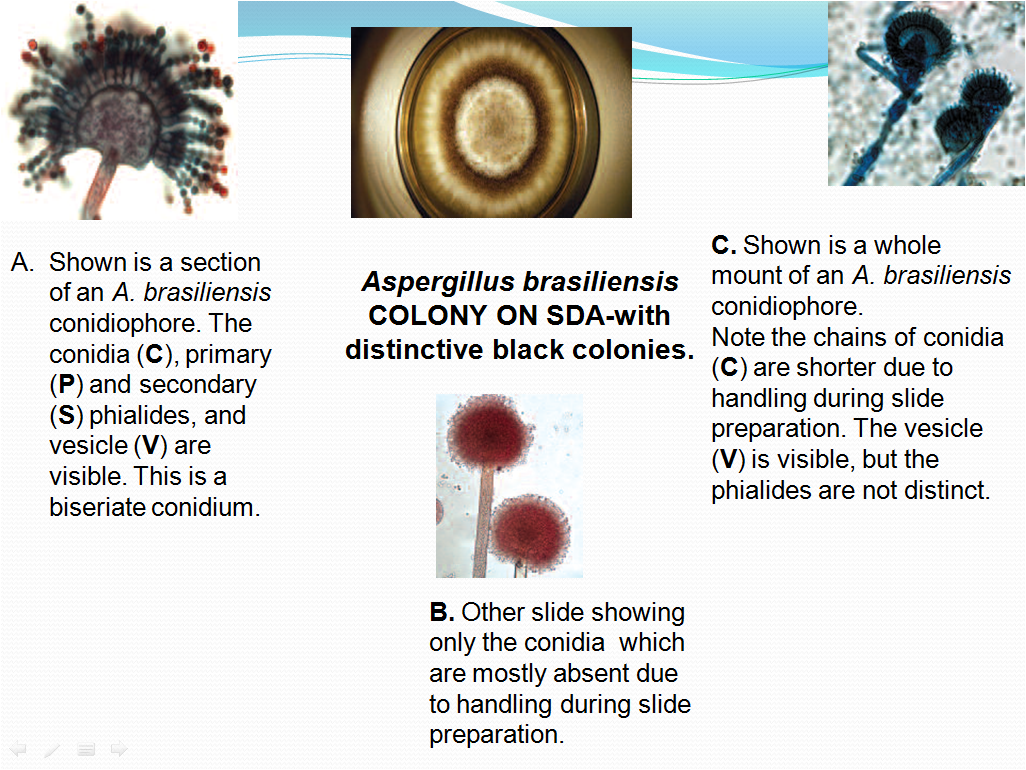
Aspergillus brasiliensis COLONY ON SDA-with distinctive black colonies.
Picture-5 Commonly found Fungus :
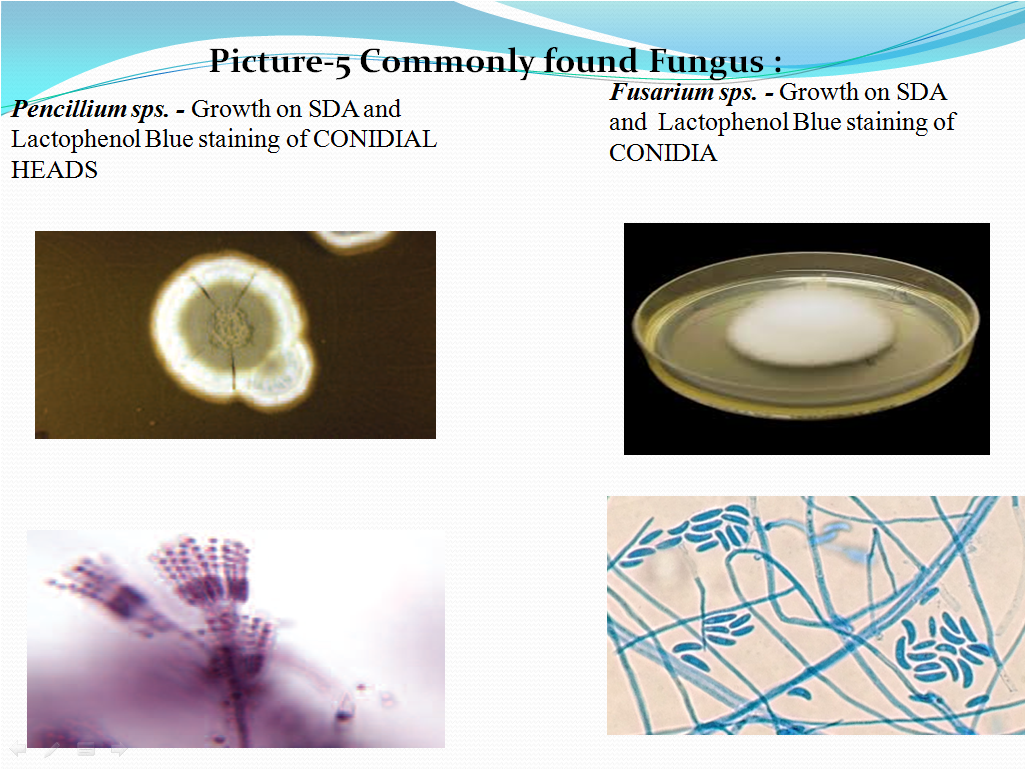
- Check the shapes and arrangement of the conidia while observation of slide along with the colony characteristics and note the details in Format or Annexure.
- Based on the colony characteristics and staining observations the organism shall be identified. If required, help of Microbiology Books, internet searches shall be taken to identify the organism based on the characteristics.
5.9 Monochrome or Simple staining.
- Prepare a thin smear of the culture to be examined on a clean and dried glass slide and heat fix it by gently passing on the flame. Allow the slide to cool.
- Follow the procedure as specified by the stain manufacturer or else follow the below mentioned procedure.
- Add 3-4 drops of the monochrome or simple stain e.g. Methylene blue or crystal violet on the smear and allow to stand for one minute.
- Wash the staining solution with running tap water and air dry.
- Observe the slide under microscope with 10X, 40X and then with Oil immersion objective(100X) and record the observations.
- The organisms will retain the staining solution and appear dark blue in color if Methylene blue is used, purple if crystal violet is used.Refer Picture 6 for microscopic characteristics of yeasts.
- Check the shapes and arrangement of the cells while observation of slide along with the colony characteristics and note the details in Format
- Picture 6- Monochrome or Simple staining for Yeasts
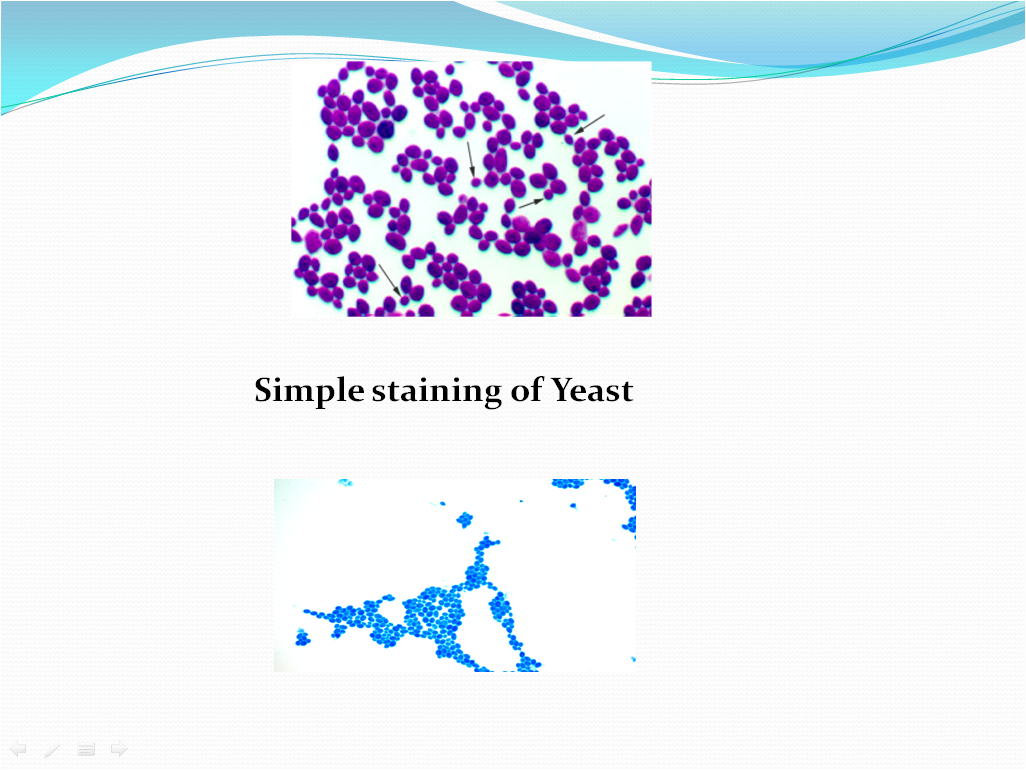
Simple staining of Yeast
5.10 Spore staining
- Prepare a thin smear of the culture to be examined on a clean and dried glass slide and heat fix it by gently passing on the flame. Allow the slide to cool.
- Follow the procedure as specified by the stain manufacturer or else follow the below mentioned procedure.
- Place a small piece of blotting paper (absorbent paper) over the smear and place the slide (smear side up) on wire gauze on a ring stand.Add 3-4 drops of Malachite Green solution.
- Heat the slide gently till it starts to evaporate(either by putting the slide on a staining rack that has been place over a boiling water bath or via a Bunsen burner).
- Remove the heat and reheat the slide as needed to keep the slide steaming for about 3-5 min. As the paper begins to dry add a drop or two of malachite green to keep it moist, but don’t add so much at one time that the temperature is appreciably reduced.
- Do not Overheat. The process is steaming and not baking.
- After 5 minutes carefully remove the slide from the rack using a tong.
- Remove the blotting paper and allow the slide to cool to room temperature for 2 minutes.
- Wash the slide thoroughly with tap water ( to wash the malachite green from both sides of the slide).
- Stain the smear with Saffranin for 2-3 minutes.
- Wash the staining solution with running tap water and air dry.
- Observe the slide under microscope with 10X, 40X and then with Oil immersion objective(100X) and record the observations.
- The vegetative cells will appear pink/red and the spores will appear green. Refer Picture 7 and 8 for the microscopic characteristics after staining and arrangement of spores in various bacillary cells.
- Check the shapes and arrangement of the bacteria while observation of slide along with the colony characteristics and spore location and note the details in Format .
- Picture 8: Arrangement of spore in the bacillary cell.
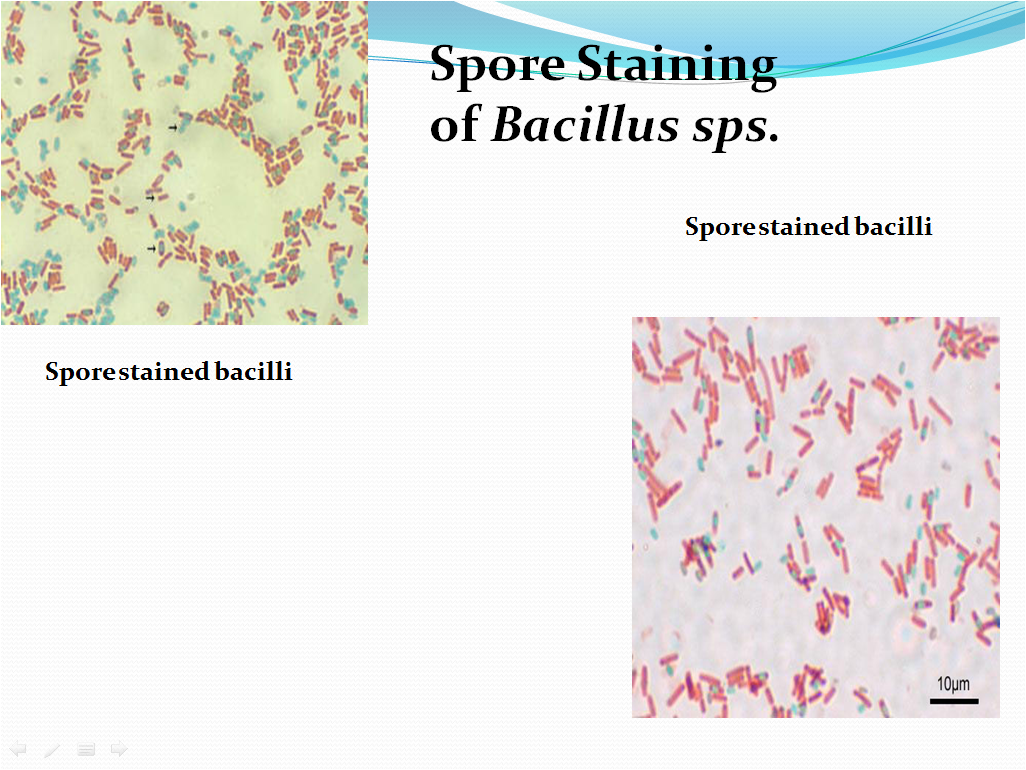
Spore Location
5.11 Isolation of Pure Culture- In house Isolates:
- Screen the routine plates of environmental monitoring program / water samples/ product/ raw material/ packing material /intermediate etc. while observation for presence of any new morphological colony such as a new shape, size, color, elevation etc.
- Colonies of new morphology, atypical colony, growth on selective agar plates shall be considered as new colonies and shall be taken for isolation and identification.
- Whenever such a new morphological colony is observed pick up Bacterial/Yeast colony with the help of sterilized loop and streak on SCDA media plate.
- Incubate the plate at 30-35ºC for 24-48 hrs if the colony morphology is of bacteria & observe for the growth.
- Identify the organisms using various identification systems, if identification systems are not available evaluate the organism using Gram character, morphological characters etc.
- If required take help of microbiological books (e.g. Bergey’s Manual) or internet searches to closely identify and characterize the organism.
- Incubate the plate at 20-25ºC for 48-72 hrs if the colony morphology is of yeast & observe for the growth.
- Identify the organisms using various identification systems, if identification systems are not available evaluate the organism using Gram character, morphological characters etc.
- If required take help of microbiological books or internet searches to closely identify and characterize the organism.
- Whenever a new morphological colony of Mold (fungus) is observed pick up Mold (Fungal) colony with the help of sterilized loop/needle and streak or place the colony on SDA media plate.
- Incubate the plate at 20-25ºC for 3-5 days & observe for the growth.
- If fungal colony is isolated staining & observation shall be done.
- If required take help of microbiological books or internet searches to closely identify and characterize the organism.
- Perform successive streaking of the colony identified in a quadrant pattern or T shape on SCDA if the organism is bacteria and on SDA if the organism is yeast/mold (fungus)
- Perform isolation till a pure culture is obtained. If required, isolate on multiple plates to obtain a pure culture.
5.12 Microscopic and colony morphology determination for in house isolates:
- Perform Gram Staining for all bacteria, monochrome staining for all yeasts, lactophenol blue staining for all types of molds (fungus), spore staining for bacillary organisms as mentioned in Pt. No. 5.7 to 5.10.
- Check and record the Microscopic characteristics, Colony morphology of the isolated microorganism in Format No. . Refer Picture 9 for details
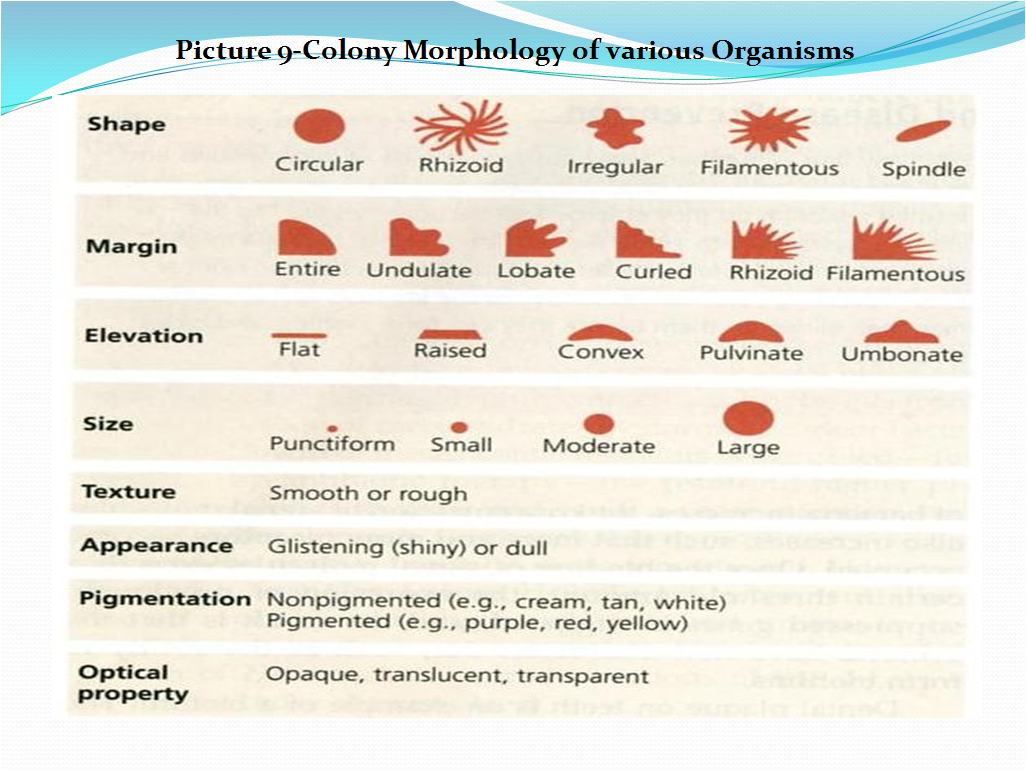
5.13 Procedure for reading of colony morphology
- Use a plate which has well-isolated colonies. Look at the largest colonies with the naked eye to determine general shape and consistency.
- Use a microscope if required to evaluate the colony morphology in detail. Place the plate on the stage, leaving the petriplate cover ON (Otherwise, your culture will become contaminated.)
- Use the 10X and 20X objective of the microscope to evaluate the colony morphology. The magnification is especially helpful for the study of elevation,surface, opacity, size, and edge if required take use of light source of microscope.
- Use of colony counter also can be done while evaluation of the characteristics.
- If you observe water condensation on the lid cover, take a wipe and carefully remove the water from the cover, then quickly replacing the cover on the plate.
- To determine Consistency,use inoculating loop or needle to pick up the colony and determine the consistency of the inoculum as the loop leaves the agar medium.
- The consistency of bacterial/yeast growth shall be described as: dry, moist, viscid (sticks to loop, hard to get off), brittle/friable (dry, breaks apart), mucoid (sticky, mucus-like).
- Based on the colony characteristics and staining observations the organism shall be identified. If required, help of Microbiology Books, internet searches shall be taken to identify the organism based on the characteristics.
5.14 Motility Test
- Motility test is useful for identification of bacteria which possess similar biochemical reactions. Following methods are used for doing the motility test-
Hanging drop method :-Soft agar stabbing method (tube method)- by using motility medium like motility indole lysine medium, motility Agar.
A Hanging Drop Method
-
- Materials:Glass slide with depression/cavity slide, cover slip, purified water, normal saline, glass pipette, soft paraffin
Procedure:
- Place a drop of bacterial suspension on the center of cover slip, apply wax or soft paraffin over the corners of the cover slip.
- Lower the depression slide/cavity slide, with the concavity facing down, onto the cover slip so that the drop protrudes into the center of the concavity of the slide .
- Press gently to form a seal.Turn the hanging drop slide over and place on the stage of the microscope so that the drop is over the light hole.
- Examine the drop by first locating its edge under low power and focusing on the drop.
- Examine under the microscope, first using 10x, then using 40x Objective.
- We should minimize the light to be giving a contrast in the background. Margins of drop are specially seen. True bacterial motility must be differentiated from non-motile particles, which shall show Brownian movement.
- Distinguish between actual motility and Brownian movement.
- Discard the cover slips and any contaminated slides in a container with disinfectant solution.
B. Biochemical screening
- After determination of the cellular morphology, colony morphology, gram staining/staining and motility perform the following test for the isolated bacterial cultures.
- Following Biochemical test shall be carried out for the In house isolates
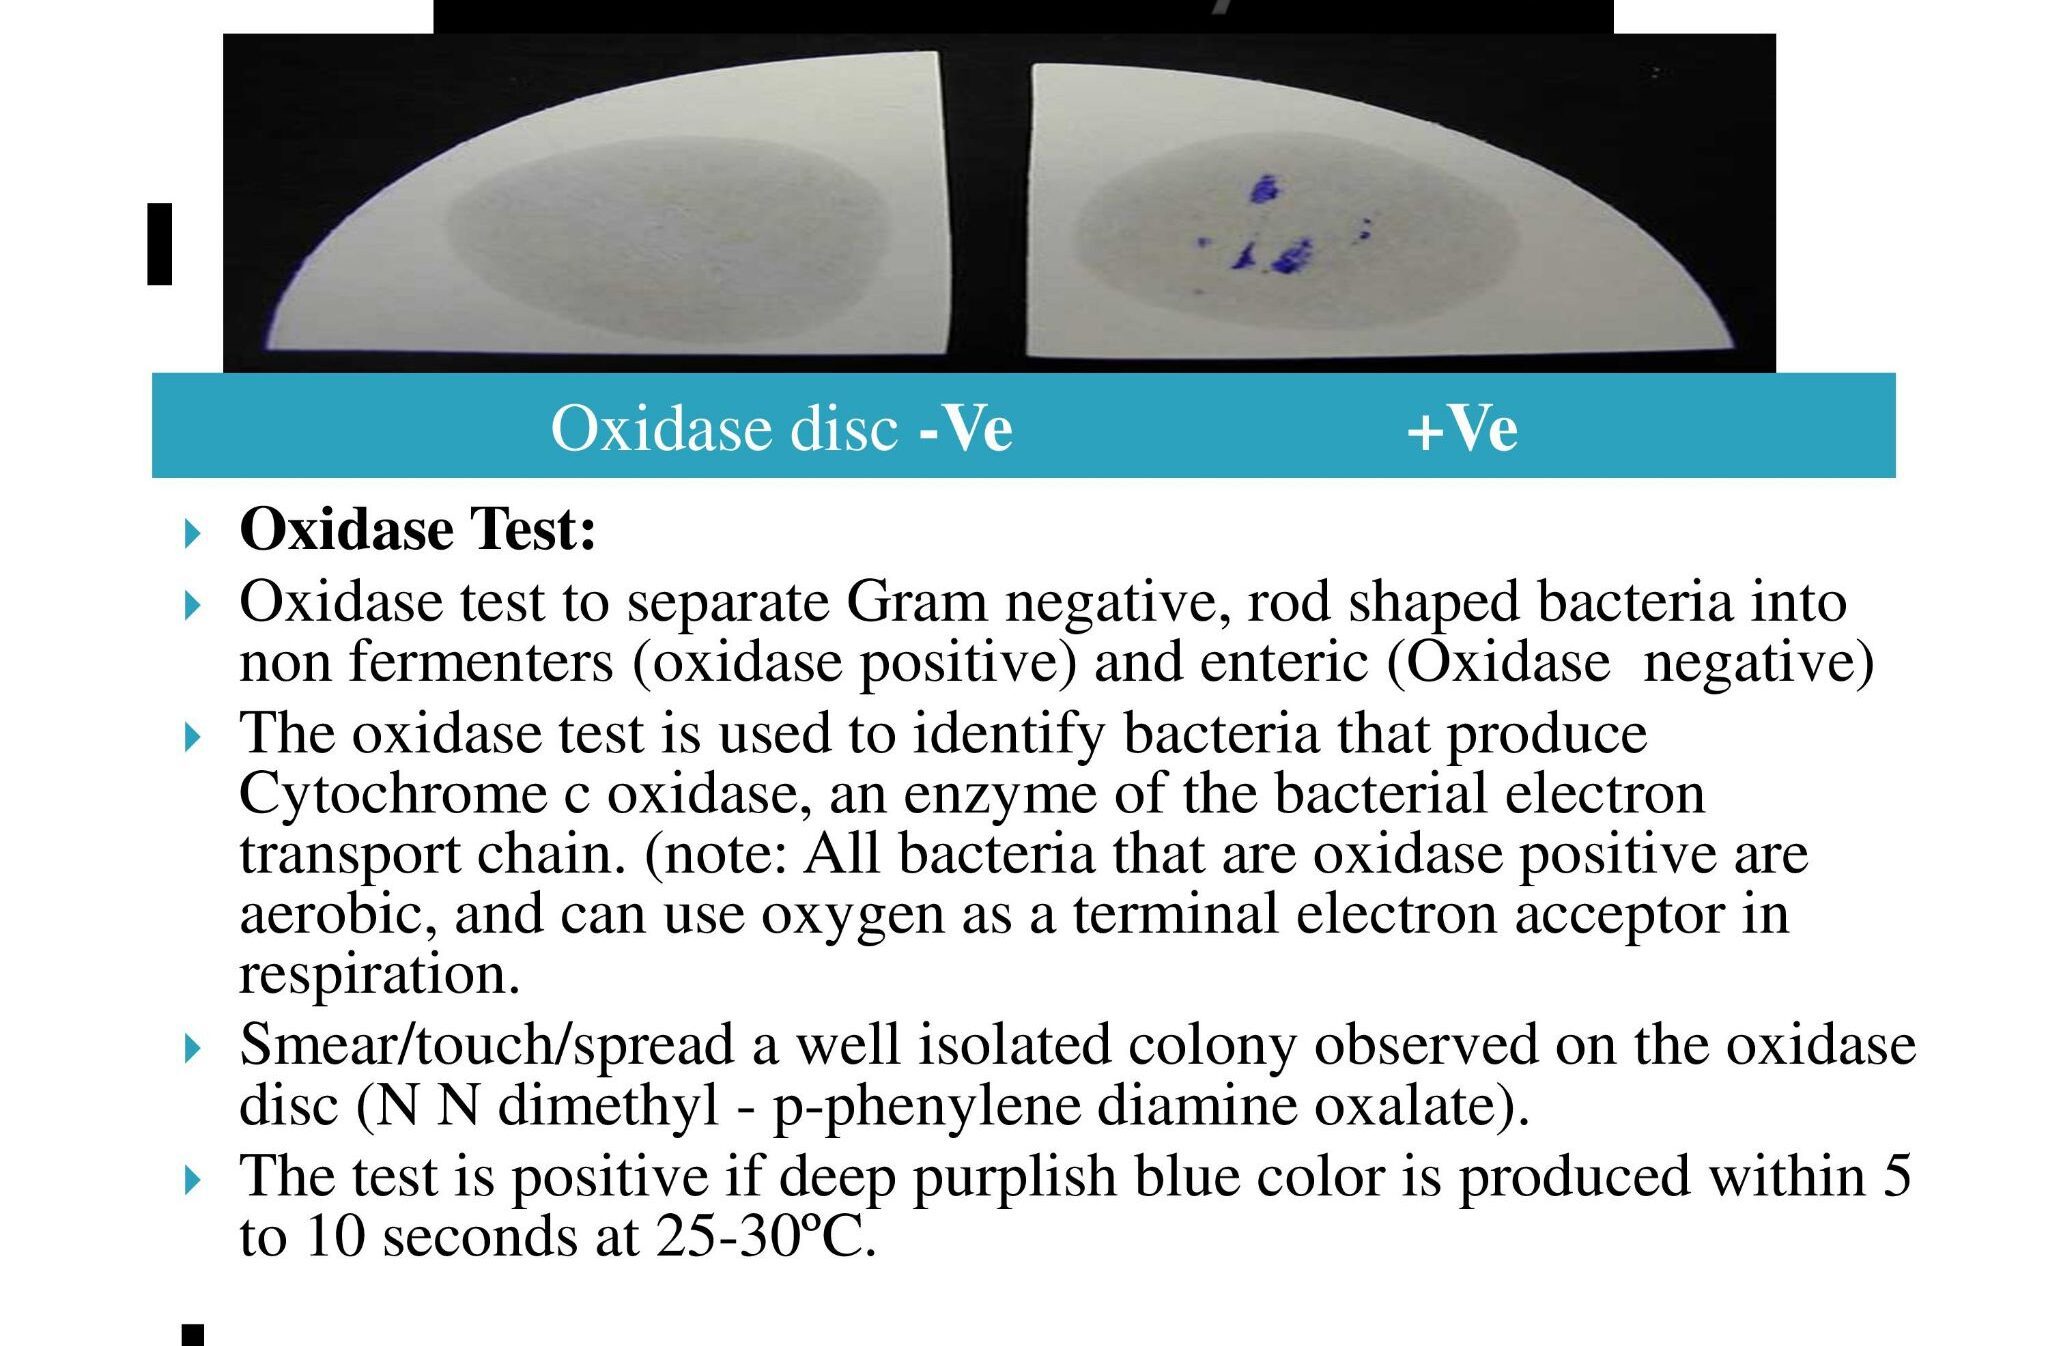
- Oxidase Test:
-
- Oxidase test to separate Gram negative, rod shaped bacteria into non fermenters (oxidase positive) and enteric (Oxidase negative)
- The oxidase test is used to identify bacteria that produce Cytochrome c oxidase, an enzyme of the bacterial electron transport chain. (note: All bacteria that are oxidase positive are aerobic, and can use oxygen as a terminal electron acceptor in respiration.
- Smear/touch/spread a well isolated colony observed on the oxidase disc (N N dimethyl – p-phenylene diamine oxalate).
- The test is positive if deep purplish blue color is produced within 5 to 10 seconds at 25-30ºC.
- Observation: Refer Picture 13
-
4. Precautions to be taken during Oxidase Test:
-
-
- Do not use stainless steel or nichrome inoculating wires, as false positive reaction shall result from surface oxidation products formed during flame sterilization.
- Growth from media containing dyes is not suitable for testing.
- Timing is critical (5-10 sec) for interpretation of results.
- Perform oxidase test on all gram-negative bacilli.
- Cytochrome oxidase production shall be inhibited by acid production. False negative reactions shall be exhibited by Vibrio,Aeromonas and Plesiomonas species when grown on a medium containing fermentable carbohydrate.
-
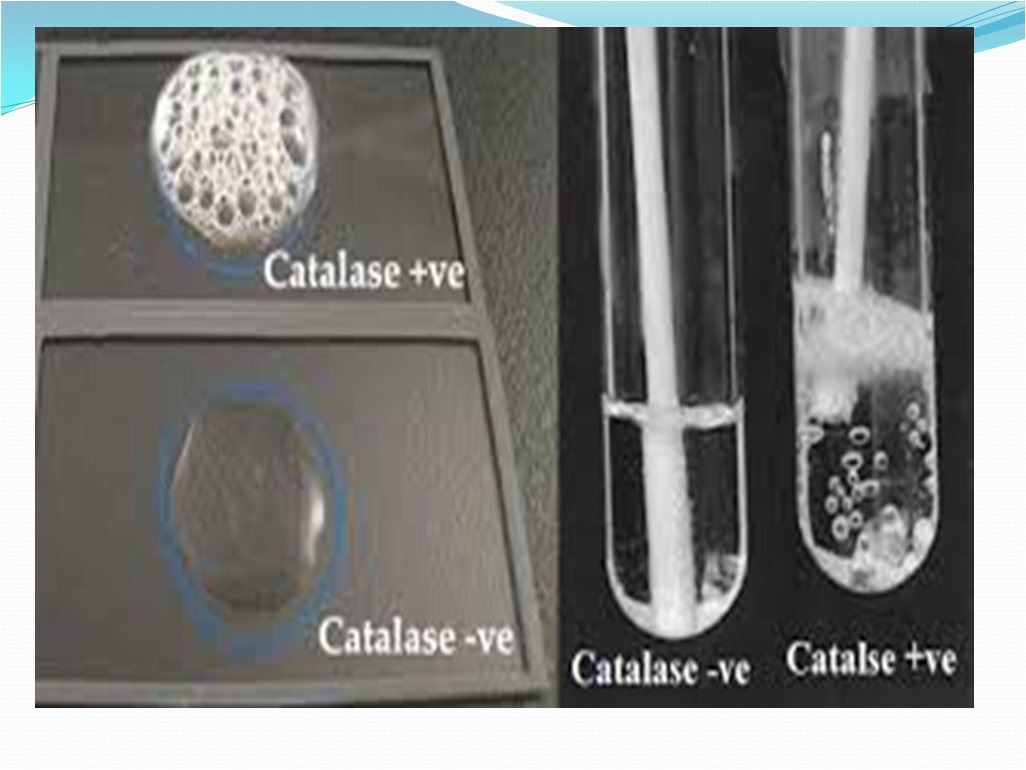
5. Catalase Test:
- Catalase test to separate Staphylococci (catalase positive) from Streptococci (Catalase negative)
- The presence of catalase enzyme in the test isolate is detected using hydrogen peroxide. If the bacteria possess catalase (i.e., are catalase-positive), when a small amount of bacterial isolate is added to hydrogen peroxide, bubbles of oxygen are observed.
a)Tube Method
-
-
- Pour 1-2 mL of hydrogen peroxide solution into a test tube.
- Using a sterile wooden stick or a glass rod, take several colonies of the 18 to 24 hours test organism and immerse in the hydrogen peroxide solution.
- Observe for immediate bubbling.
-
b)Slide Method
-
-
- Use a loop or sterile wooden stick to transfer a small amount of colony growth in the surface of a clean, dry glass slide.
- Place a drop of 3% H2O2 in the glass slide.
- Observe for the evolution of oxygen bubbles.
- Observation: Refer Picture 14
-
- Positive: Copious bubbles produced, active bubbling
- Examples: Staphylococci, Micrococci, Listeria, Corynebacterium diphtheriae, Burkholderia cepacia, Nocardia, the family Enterobacteriaceae (Citrobacter, E. coli, Enterobacter, Klebsiella, Shigella, Yersinia, Proteus, Salmonella, Serratia), Pseudomonas, Mycobacterium tuberculosis, Aspergillus, Cryptococcus, and Rhodococcus equi.
- Negative: No or very few bubbles produced.
Examples: Streptococcus and Enterococcus sps.
Precautions to be taken during Catalase Test:
-
-
- Culture should be 18 to 24 hours old.
- Hydrogen peroxide must be fresh as it is very unstable.
- Iron wire loop should not be used.
- Some bacteria produce a peroxidase that catalyzes a breakdown of hydrogen peroxide causing the reaction to be weakly positive; (a few bubbles elaborated slowly). This should not be confused with a truly positive reaction.
- Do not add organism to reagent, particularly if iron-containing inoculating loops are used. Iron containing loops will cause false positive test results if exposed to hydrogen peroxide.
-
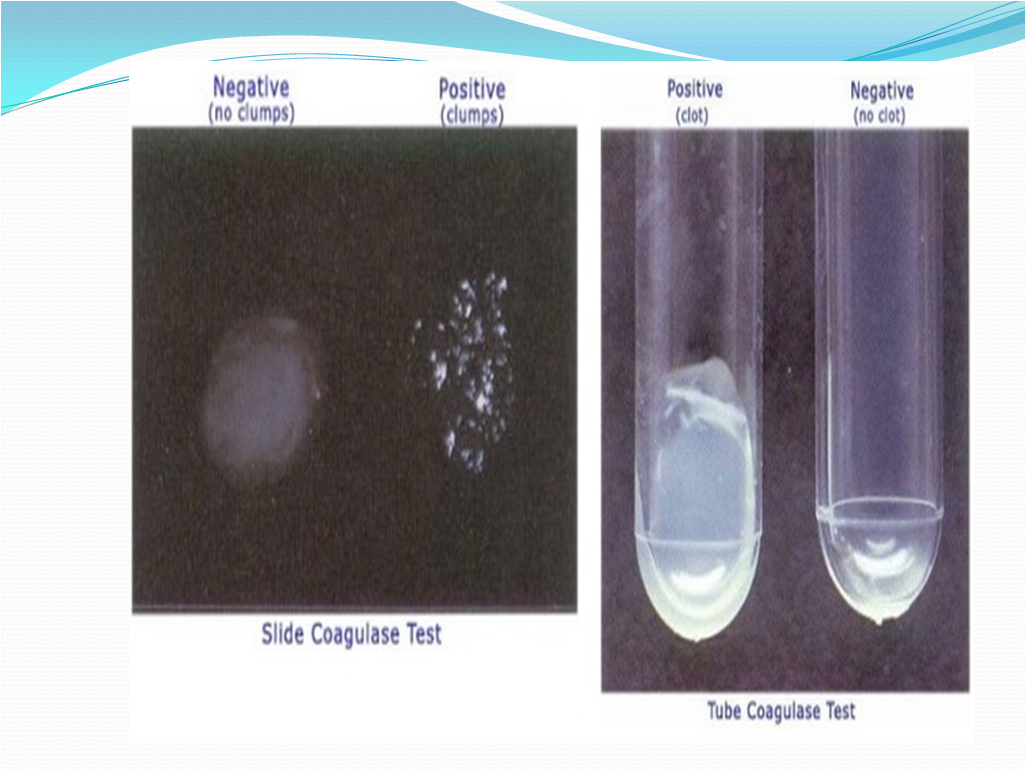
6. Coagulase Test:
-
- Coagulase test to separate Staphylococci into Coagulase negative (presumptively non pathogenic) and Coagulase positive (more likely pathogenic) Staphylococci.
- Coagulase is a protein enzyme produced by several microorganisms that enables the conversion of fibrinogen to fibrin. In the laboratory, it is used to distinguish between different types of Staphylococcus isolates.
- Slide Test (to detect bound Coagulase)
- Place a drop of sterile 0.9% saline on each end of a slide, or on two separate slides.
- With the loop, straight wire or wooden stick, emulsify a portion of the isolated colony in each drops to make two thick suspensions.
- Add a drop of human or rabbit plasma to one of the suspensions, and mix gently.
- Look for clumping of the organisms within 10 seconds.
- No plasma is added to the second suspension to differentiate any granular appearance of the organism from true Coagulase clumping.
- Tube Test (to detect free Coagulase)
- Take sterile test tubes and add 5 mL mammalian plasma (rabbit/horse) with or without additives in it.
- Take 3 test tubes of the plasma and label as T (Test), P (Positive Control) and N (Negative Control). Test is 18-24 hour culture of the in house isolate, Positive control is 18-24 hr S. aureus culture and Negative control is sterile plasma.
- Inoculate the colonies in the labeled tubes respectively.
- After mixing, Incubate the tubes on water bath at 30-35°C.
- Examine the tubes at 3 hours and subsequently at suitable interval up to 24 hours.
- Observation:
- Fibrin Clot of any size- Positive
- No Clot- Negative
- Clumping in both drops of slides indicates that the organism auto agglutinates and is unsuitable for the slide Coagulase test. All the negative slide test must be confirmed using the tube test.
- During slide test, there shall be chance to false positive results in case of citrate utilizing bacteria ( Enterococcus and Pseudomonas). In this case also, tube test should be performed and confirmed.
- Coagulase Positive Organisms:
- Staphylococcus aureus and other animal host bacteria like S. pseudintermedius, S. intermedius, S. schleiferi, S. delphini, S. hyicus, S. lutrae, S. hyicus.
- Coagulase Negative Organisms:
- Staphylococcus epidermidis, S. saprophyticus, S. warneri, S. hominis, S. caprae,etc.
- Limitation of Coagulase test:
- The slide test should be read very quickly, as false positives can occur.
- Auto agglutination shall occur.
- Use water instead of saline for mixing if auto agglutination occurs.
- The slide test should not be performed with organisms taken from high-salt media such as Mannitol Salt Agar, as the salt content can create false positives.
- Over mixing shall cause the clot to break down.
- The tube test is more reliable than the slide test.
- Samples must be observed for clotting within 24 hours. This is because some strains that produce Coagulase also produce an enzyme called fibrinolysin, which can dissolve the clot. Therefore, the absence of a clot after 24 hours is no guarantee that a clot never formed. The formation of a clot by 12 hours and the subsequent disappearance of the clot by 24 hours could produce a so-called false negative if the test were only observed at the 24-hour time.
- Picture 15-Coagulase Reaction
6.0 ABBREVIATIONS:
- No. Number
- QA Quality Assurance
- QC Quality Control
- SOP Standard Operating Procedure
- GPT Growth Promotion Test
7.0 ANNEXURES:
Nil
8.0 DISTRIBUTION:
MB
9.0 REFERENCES:
9.1 USP 39 Chapter <1113>- Microbial Characterization, Identification and Strain Typing
9.2 PDA TR 13 (Revised): Fundamentals of an Environmental Monitoring Program
9.3 A Photographic Atlas for the Microbiology Laboratory: Michael J Laboffe & Burton E. Pierce.
9.4 Pharmaceutical Microbiology Manual -2014
9.5 Bergey’s Manual of Determinative Bacteriology
9.6 Bergey’s Manual of Systemic Bacteriology
10.0 REVISION HISTORY:
New
This was beautiful Admin. Thank you for your reflections.
I’m typically to blogging and i really recognize your content. The article has actually peaks my interest. I am going to bookmark your website and hold checking for brand new information.
Thank you for another informative site. Where else could I get that type of information written in such an ideal way? I’ve a project that I am just now working on, and I’ve been on the look out for such info.
Introducing Boostaro, a powerful age-supporting supplement meticulously crafted to enhance healthy blood flow in men, all from the comfort of their own homes. This formula harnesses the potency of clinically studied ingredients to naturally promote firmness and vitality, eliminating the need for costly treatments or painful surgical procedures. Carefully selected, Boostaro’s ingredients work in synergy to enhance strength, stamina, and rejuvenate youth in a natural and holistic manner.
Thank you so much for giving everyone a very remarkable chance to check tips from here. It is often so nice and stuffed with a great time for me personally and my office mates to visit your web site no less than three times a week to learn the fresh things you have got. And indeed, I am also usually amazed for the magnificent tips you give. Selected 3 facts in this posting are unquestionably the most beneficial we have ever had.
Spot on with this write-up, I really think this website needs much more consideration. I’ll most likely be again to read way more, thanks for that info.
Hey, you used to write excellent, but the last few posts have been kinda boringK I miss your tremendous writings. Past few posts are just a little out of track! come on!
Hello! I just would like to give a huge thumbs up for the great info you have here on this post. I will be coming back to your blog for more soon.